
Sometimes, editing pictures can be a faster and easier way to produce concepts for characters, and since this could help with the fantasy brief, we had a tutorial on how to create a vampire (and later on an orc/goblin) in photoshop. For this post, I won’t be including every part of the tutorial, I’ll just be explaining which parts I used or wanted to use and how I made myself into a vampire.
Vampire
The first thing I do, and the thing I always start with when I’m trying to create a piece of art (or create anything in general), is to find inspiration. I went to Pinterest to find some images and artwork of vampires and try and pick the kind of vampire I want to create.

I really like certain elements, like the sharp teeth (obviously), the dark aesthetic and colours, and the black eyes. I thought that going with red or gold for the eye colours would be a bit generic and filling them completely in black would be a much more interesting and unique approach and one that I wouldn’t have thought of if I didn’t find the images.
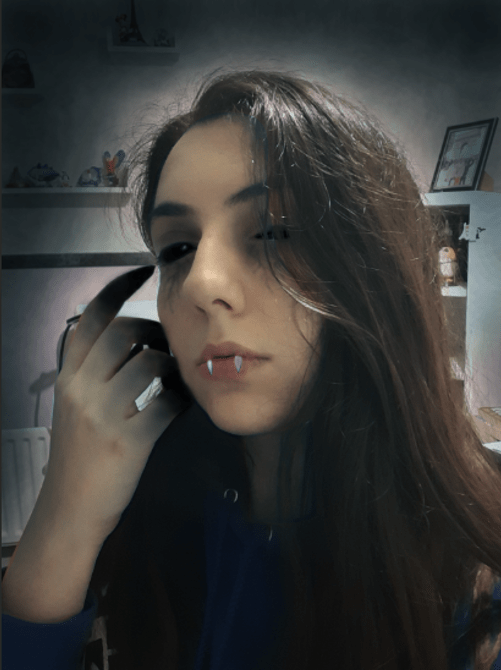
Now that I had some ideas, and I knew what I was going to be doing, I chose a selfie that I took a while back to work with, my first instinct was to go with an image of a celebrity to photoshop, but I knew that there may be copyright issues and it would just be easier to use am image of myself. I put the photo into photoshop and started with the teeth. My mouth is closed in the image, but I knew that this wouldn’t be a problem because I wanted to have the teeth sticking out. So, I went to Google to find an image of vampire teeth in the right position for the photo. It was a little hard since most of the teeth were either too dirty or facing the wrong way. I knew that I could always use the warp tool to stretch them and change their position, but it would be much easier to simply find the right image and paste the teeth onto my mouth. Luckily, I found one that I thought would work and immediately imported it into a layer above the original image. Next, I grabbed the lasso tool and began to draw around the teeth ad carefully and accurately as possible. I then hovered within the section, right-clicked and selected ‘layer via copy’ to put each tooth into its own layer. I renamed them Tooth 1 and 2 and then positioned them where I wanted them to be on the mouth.


Next, I went to the eyes. Usually, if I was just going to change the colour of the iris, I would simply draw an ellipse over each eye in the colour I want and use the smudge tool or rubber to blend it in. However, since I would be covering the whole eye in black, I opted to just use the paintbrush and fill in each eye in black. I zoomed in for accuracy and started drawing on a separate layer over my eyes, making sure to go around the highlight. I changed the opacity of the brush bit by bit as I got closer to an edge in order to blend and make the black less jarring. I also used the rubber quite a lot to rub out areas where I went wrong or to help with blending. The left eye was quite easy, but I had some difficulty with the right one because my hair was covering it. As I worked with the paintbrush, I used a mixture of going around the strands of hair, and just painting over certain areas, then changing the opacity of the layer to see what’s underneath and rubbing out the areas under the hair. These methods would have worked in theory if I paid closer attention to details and had more time, but I wasn’t super accurate with them. Despite this, I am still quite happy with how the eyes turned out, and you cannot see the imperfections of the right eye unless you really zoomed in.

My next area of focus was my hands. I had the idea of stretching out my fingers to give myself long, pointed fingernails. This isn’t a trait that is generally focused on with vampires but I think it makes sense since they are a predatory species, plus it looks really cool. To do this, I used the lasso tool to draw around the top area of my finger and then clicked ‘layer via copy’ to put a copy of it into a separate layer. With it selected, I went to ‘edit’, down to transform, and then ‘warp’. This allowed me to stretch the finger and bring in the edges to make it sharp and pointy at the end.

I wasn’t satisfied with just that though, I wanted to make my hand more interesting, so I went ahead and started darkening my fingers, going in with the same technique as my eyes, with the highest opacity of black at the tips and lower opacity slowly fading out along the finger. I had some trouble with trying to blend everything out nicely, but I kept going over and over the layer until it was as smooth as I could get it, and even then, there were little lumps or holes. I love the effect it gave the image though; it made me look even eviler and vampire-like. Once I was done with each finger, I went back to the edges with the rubber to erase any paint that had gone over the edges and beaten everything up. I also went back to the mouth for a short period of time, to try and fix the teeth a bit, and make them look less like they were plastered ontop. I rubbed out the curved tops so that they looked like they were coming out of my mouth. Then, using the clone stamp, I went to the original photo, held alt over the area of my mouth I wanted to pick up, went back to the teeth layers, and placed it ontop, repeatedly doing this whilst changing the opacity and flow so that the teeth were blended in.

After this, I started to work on creating my vampire complexion. I went back to the original photo and using the lasso tool, drew around my face. Afterwards, I clicked on the adjustment layer icon, selected curves, and a new layer was created, in which I could edit the area I lassoed around. I experimented a bit, trying to make my skin paler, or more green or blue and I settled on a sickly dark colour which I can’t quite describe, but in my opinion, makes me look very much like a dark, powerful vampire. I repeated these steps for any area of skin showing, so the hands and neck. For the neck, I had to make the change more subtle, since it’s in shadow. Again, using the rubber, I went back around the edges, rubbing out areas where the mask oversteps my skin and where my lasso line was inaccurate. I also chose a few other adjustment layers to work on my skin slightly and I changed things like the brightness, contrast and saturation, all with an aim to give me that dark, evil look. Colour balance, was one that I found particularly useful, allowing me to change the hue of my skin and make it more green, blue or red, or as I opted, all three (grey).


Now that my skin was done, and I looked much more like a vampire, I went back to focus on my eyes. The black looked cool, but I wanted to draw even more attention to them and add some extra detail. To start with, I used the paintbrush again, to darken the area around my eyes significantly, on the eyebags, in the creases and corners, and the area around as well, making everything more black. After all, the eyes are the window to the soul, and having them so dark everywhere shows that I am a heartless vampire with secrets and shadows. To complete the look, I made the brush size quite small, turned the opacity up, and began drawing veins underneath my eyes. I wanted to look possessed as if I was just about to channel some dark energy or go out to hunt. In y opinion, the veins were a perfect addition, and they make me look positively paranormal!

For the final touch, I decided to change my surroundings a bit. The background ruins the effect a little bit since you wouldn’t expect a vampire to be in a teenager’s room. I thought of cutting myself out and inserting a new background underneath, perhaps a dark forest, gloomy cabin, or dungeon backdrop. But then, I thought it would be even better to give the impression that I am in fact a normal teenage girl, and I am in the middle of my transformation into my vampire form. This would explain the clothing, the hands and face which aren’t quite yet fully dark, and the setting. So, I grabbed my handy paintbrush and increased the size. I then started dabbing along the edges of my room, changing the opacity as I work inwards, to make it look like a dark cloud or energy, or even the atmosphere darkening as I transform. This really brought the image together and made me look much less random; the black around me balances out the black on my face and hands.
Here is the final result!

I loved this task – watching me slowly turn into a vampire was really cool, and it was fun to think of what to add next and how to improve it even further. My favourite part was editing the eyes and I think that it really wouldn’t have been the same if I had simply changed the colour to red or gold. The black in and around them, and the veins give the whole image a much darker aesthetic, and you could imagine this vampire possessing some dark magic along with the supernatural abilities. I feel a lot more familiar with photoshop as well, and a lot of the skills I learned are applicable to so many other types of characters. I made a quick animation in After Effects to show this transformation. I tried to use morphing VFX but I also wanted to include the background and because of this, I had problems with the mask. I ended up just animating the opacity, but I still think it looks really cool.
Orc
After creating a vampire in photoshop, we moved onto learning how to create a goblin or orc character. The previous skills learned form the vampire session were completely applicable, but we also learned some extra techniques that allow for an even greater range of editing and transformation. As always, I began with gathering inspiration. There are so many beautiful pieces of art on Pinterest and so many concepts for orc and goblin characters. I had a lot to choose from, and my idea bank grew to an even greater size than for the vampire lesson.

At this point, I was decided on doing an orc, and I noted down some of the key elements that were recurring in their designs: green skin, sharp teeth that stick out from the mouth, a large figure, dark hair, a range of weapons and clothing varied from rags to armour. Generally, orcs are seen to be fearsome, strong, loyal and skilled in battle. Their demeanour is one of a giant, but less clumsy, so I’d have to find some way to make the person I was editing much more powerful and scary. Other little details I picked up on were rings in the nose and ears, scars and tears, tattoos and beads or feathers in the hair. Orcs are tribal creatures and they seem to have a lot of markings and belongings from a village or family on them.
Once I had some general ideas for what I was going to do, I then had to pick out a photo I was going to edit. This time, I didn’t want to turn myself into an orc because I didn’t know how the design would work with my face, and I had more ideas for how to make a male orc, rather than a female one. So, I went for a picture of Orlando Bloom. I find that it would be quite ironic to see him as an orc since one of his most famous roles is playing as the elf Legolas from Lotr. I also knew that I would be adding a lot of extra elements over the top of him, so I gathered all of the images I would be focusing on and potentially adding to Bloom beforehand.

It was finally time to move into the photoshop and began transforming Bloom. I began with importing his picture in and naming the layer ‘base photo’. Then, I went to ‘filter’ at the top and selected liquify. Liquify is an extremely resourceful and it has loads of options to play around with. The ones which I started with were the options in the ‘face-aware liquify’ section, which allowed for some quick and easy editing. The tool automatically picks up on a face and where it’s features are, and allows you to make changes. I used almost every option but the changes I made were quite small since I wanted there to be a subtle difference. The reason for this is because I knew I was going to be adding quite a lot of cut-outs on top, so the face was going to change quite dramatically anyway. I used my mood board and images for reference and decided on what kind of changes to make for that. Orcs have quite square/rectangular faces, with prominent jaws varied foreheads. I changed Bloom’s face shape slightly because of this, extending his forehead to make his face seem larger and making his jaw wider. I also noted that generally, orcs have small eyes, but since I knew that Bloom’s face would be getting bigger, I made the eyes slightly bigger too. I also made one eye slightly larger than the other to add some imperfections, made them more wide-set (further apart) and also turned them inwards. My aim was to give him an angry look, so I would also be changing the eyebrows later on. The last main change I made was with the nose, which I scaled upwards slightly. Orcs don’t generally have gigantic noses, but they have a very particular shape. In my opinion, a lot of orc facial features resemble human features, but their facial structure is quite different from ours, so a lot of the changes I made were little since face-aware liquify changes the size of certain things, not where those things are on the face. So, as I said, the differences are subtle, but they are definitely there.


Now that I was finished with that section of liquify, I went on to make some more prominent changes. I wasn’t a hundred percent satisfied with the nose, so I knew that I had to do extra work on this. To make the changes I wanted, I went to the freeze mask tool and started painting the areas around the nose which I didn’t want to be affected. The red pain indicates that those areas are protected and won’t be moved or stretched if I go over/near them with the warp tool. Once I had the nose surrounded, I used the warp tool to move it upwards and shape it to be more similar to an orc’s nose. First, I increased the brush size to the point where it was as big or slightly bigger than the nose, and this enabled me to just grab the entire thing and move it upwards. Of course, this caused some distortion which I would fix after, but I went back in with a smaller brush size to reposition the nostrils and edges of the nose. This was because, in all of my reference images with the close up of an orc’s face, you could see that the nose was very upturned at the edges, and the nostrils were quite big. Their noses are also quite high up and close to their eyes, which I attempted to do, but I couldn’t push it too far since that would cause major distortion.

I still wasn’t completely happy with the nose, but I knew I couldn’t push it further otherwise it would look too strange, so I moved onto the next body part I planned to alter: the ears. Orc ears are pointed, but unlike the smooth curvature of elf ears, they are fleshy and relatively large. Using the lasso tool, I traced around each ear and clicked layer via copy to put them into their own separate layers. Then, I selected the layer, went to ‘edit’, ‘transform’ and finally ‘warp’. Warp gives me the freedom to stretch and change the shape of the ears however I like and I could have gone completely wild with this tool, but I opted to just make the ends pointed, which is the simple approach. Looking back now, however, I would have liked the ears to be more pointed and I feel like the change I made was too little and not noticeable enough. After I had stretched both ears, I used the clone stamp to fix any distortion on both the ears and the nose.
Now, for the big change. I knew that I had to dramatically change Bloom’s mouth and add teeth as well. There was just no way to do this with warp or liquify. So, I imported an image into a separate layer above, and this had the mouth that I wanted to paste onto his face. I simply turned the opacity down to see the layer underneath, positioned the mouth as best as I could and then rubbed out the areas around it which I didn’t want or didn’t fit with the contours of Bloom’s face. It looked really out of place but I knew I was going to be adding texture and colour, and just changing the skin completely anyway, so this was alright.

I considered going back into liquify and pulling out welts from the skin and creating deformities, but I wanted it to match the bottom half and the mouth and there are lot’s of little bumps that make up the texture which would take an incredibly long time to recreate by hand, so I decided to try and find a picture of skin texture that would match. This was surprisingly hard because any orc with the right texture had lots of bends, curves and sharp edges that wouldn’t work with Bloom’s face. I wanted something a bit more smooth, and eventually, I settled on this image.

I was quite fortunate in finding this because it’s a perfect ready-made template for an orc. I was only going to use the skin though and it was a shame that I couldn’t apply things like the ear for example. I did the same thing as before for the mouth, but this time, only rubbed out the areas over the face and tried to have as much of the skin visible as possible. I also used a blending mode to make it look less like a sticker on top, and more like it was infused/part of the skin. Then, I erased the eye areas and the eyebrows, as well as most of the nose, since they didn’t match with Bloom’s face. Then there was a lot of work to be done to spread the skin texture over areas I had missed or erased, blend it all in and make sure it aligns and works well with the mouth. I began with using the clone stamp to fill in the gaps and build up certain areas. I also used the texture from the bottom as well to try and blend it all together. I got quite far and the skin was actually starting to look really good. I had pretty much added it to every area of the face, and there were no spots of Bloom’s actual skin anywhere.
Unfortunately, this is when Photoshop gave up on me.

I couldn’t get back to the file, even though I saved it regularly. There was some sort of mistake or crash and all of my work became inaccessible. I hadn’t quite finished it, and I did have some of the screenshots, so all was not lost, but the last screenshot I took was not where I was up to with the work.

You can see how I was beginning to build up the skin colour and texture, and how I was slowly working my way down. I got further than this and managed to blend everything in with the mouth, as well as make the skin around the mouth more greenish-yellow, to match the rest of the face. The wrinkles around the nose were rubbed out and adjusted too so that they were in line with the mouth. I still could have done quite a lot, for example, I wanted to add beads and feathers coming out of the hair, or perhaps even add a bun on the top of the head since I know some orcs wear it like that. What I was planning on doing for definite, however, was changing the skin colour on the neck and ears and adding that same texture, adding a tattoo, stitches, scars and cracks to the face, changing the eye colour, and finally the background. I am confident that I could have done all of these things since they use the same skills I learned for the vampire and/or applied already for the orc. I have a much better understanding of photoshop now, and I know that if I wanted to, I could edit another face into a vampire, an orc or a goblin. And since most of the techniques are transferable, with a quick tutorial from youtube to learn some extra bits, I think I can create other different fantasy characters as well.
I think that the most useful thing I learned was the liquify and warp tools, because they are so versatile and allow for a huge variety of edits to be made, even outside of faces and transformations like these. In the future, when I have spare time, I plan to experiment with these further and use youtube tutorials to learn how to create other art on photoshop, but I won’t be using this for the fantasy brief I don’t think. I want to focus on concept art of my characters and environments drawn on paper, or digitally. Whilst this method is fun and allows for some variety in the concepts, it takes to long to produce and since I’ve only just grasped the basics of this method, I could easily make a mistake like I did with the orc and lose or ruin my work in some way. Personally, until I have time to get a better grasp on how the different tools work and I am confident and fast enough, I think that I will stick to drawing my characters rather than creating them via editing.
Love the style of the blog Tina. Yes please if you could add detail to this and how you did it as evidence that would be great. Also don’t forget to post the orc/goblin task and do the same, as that was all based around the liquify tool. Nicky 🙂