
Recently, we were introduced to another Adobe program called Animate, which is designed for the creation of fbf animation and motion graphics. I have already worked a little with Animate, so I wasn’t entirely new to it and could operate with some of the main features and tools. Whilst it was great to recap some of my baseline skills and learn some new things, I have plans to look at this program more in-depth and broaden my understanding of the more technical side, since that is where I feel most work is needed.
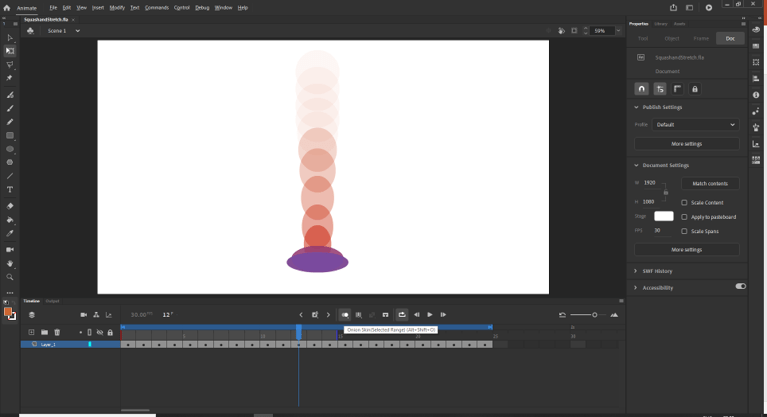
The first animation we created using the program was a recap of one of the 12 principles of animation, and one of the earliest animations we learned to create: the bouncing ball. A well-known movement in the animation industry, which is great for practice and encompasses the squash and stretch principles used in most movements. Luckily, I already knew how to create this, as I had worked with some of the basic tools in Animate. The first step is to create a circle, which is very simple thanks to the shape tool. Then along the bottom, the option to create a new keyframe is selected every time there is a slight change in the frame, meaning you move the ball slightly each time a new keyframe is placed.

I kept the amount I moved the ball pretty consistent for the beginning, but as it got closer to the bottom of the screen, I increased the distance between the last position and the new position more and more, to show the increase of speed as it neared the ground. Another thing to note when doing this is that a bouncy ball changed shape as it bounces, and in order to be realistic and show mass and gravitation pull, this also needed to be shown. Using the transform tool, I stretched the ball increasingly as it came closer to hitting the ground, making sure to thin it out as I was increasing the length (the shape may change but the mass stays consistent) and abruptly stretching it the other way to show that it had made contact with the ground and using pacing to show the high speed. This was when the squash and stretch really came into effect.

A very useful feature in Animate is the onion skin, which lets you see a chosen amount of previous frames and future ones depending on where in the timeline you are. You can customize the colour, starting opacity and opacity decrease and are then able to work more efficiently, as the need to guess how the object looked in the previous frame is eliminated. Thanks to onion skin, I am always able to make accurate changes, so that the animation is smoother, and it certainly helped for the bouncing ball, as I was able to change the distance the ball fell each time and tinker with the speed. It’s also a great way to look at the animation as a whole at a quick glance:
Something that really sped up the process was finishing with the movement of the ball falling, copying and pasting those frames right next to the first, and simply reversing them. This saved a lot of time, as I didn’t have to animate the exact same movement twice, and I didn’t have to fuss about matching the speed and movement to the first fall. Next, I selected all of the frames and clicked the ‘loop’ button, to make the animation repeat itself. I had already used this tool, but I remember my first impression being that it was much easier and quicker than adding a loop in After Effects, where you had to apply an expression. After I had the main animation and watched it back a couple of times, I made a few tweaks and made sure it was smooth, which mainly involved deleting or moving around a few frames where the first movement cut and the reversed copy began. Once I was satisfied, I changed the background colour by going into the ‘doc’ section in order to make it more fun and bright. Since it was a super short and looped animation, I exported it as a GIF, which is also super easy, since it is a given option in Animate.

I think that it turned out really smooth and professional looking and it was pretty simple to make. However, the same could be said for After Effects where a similar result would be obtained in even less time. In AE, it would be less tedious because you would only need to move the circle once or twice, rather than a little bit with every new keyframe. If it was my aim to create something as simple as this, I would definitely go to After Effects, as it is always better to save yourself time and extra work in a project.
We moved on to do a different type of animation. In the same way as the first, I created a HD full document and selected the nifty button ‘fit to screen’ which automatically zooms the canvas out so that all of it is visible in the work area. Instead of using the shape tool, I selected the paintbrush and drew a face in the middle of the screen. The aim for this animation was to create a simple blinking motion, but since I had already worked with Animate before, and had animated a hand-drawn face, I made it a bit more complex.

As always, I used onion skin, because I wouldn’t have been able to make consistent little changes if I could not see the character in the previous frame. One thing that I found particularly difficult, was drawing the same lines as the previous time (except for the changes). For example, the head shape was very difficult to get right each time, and I would either go over or under the lines, so it fluctuates quite a lot in the final animation. I was aware of the option to insert a normal keyframe rather than a blank one (the blank ones erase everything from the frame whereas the normal ones keep it and simply duplicate it) but that made it harder to gauge which lines to rub out and where to make the changes. Without having to redraw the whole face, the animation would have been stiff and strange, as if the face was moving without the head. So, I chose to stick to redrawing it each time and accepted that it would move quite a lot in the end.

I still wanted the character to blink, but to make it interesting, I also tried animating a turn and change in facial expression, which mainly involved moving the facial features, and changing the shape of the mouth and eyes a little each time. I found myself using the erase tool a lot because I was making mistakes frequently, and it was quite annoying having to change the size of the brush from how it was as a paintbrush to how I wanted it as an eraser (big to small). Luckily, having experienced this issue before, I knew that the best solution was to create a preset for both the paintbrush and eraser so that my preferences for their sizes were set, and I simply needed to click once in the toolbar to change them each time, rather than adjusting them with the slider, which takes much longer.

Whilst I was drawing, I was trying to figure out which method I liked best when it came to animating. For this one, I was using the ‘straight ahead’ method, because it was all I had used before and it is what I know best. I couldn’t help but wonder though if the ‘pose-to-pose option would be better, because there were certain disadvantages straight ahead that I was noticing. I found it a little disconcerting that I could not see a target, the goal for which position the character has to end up in, and I had to decide when to make the changes myself. I think filling in between set positions might be easier, and I really want to look into this for the next animation that I do, so that I can practise and truly decide which method works best for me. Here is the final animation as a GIF:

This is my third attempt at animating a character by drawing each keyframe and this time, to slow it down, I inserted blank keyframes when I wanted a certain frame to last longer. I was careful not to overdo this and rely mostly on my own little changes to the face. I also changed the frame rate to the standard 24fpfs so that it was less choppy. Overall, I am fine with how it turned out since it wasn’t a bad attempt, but there is also a lot to improve upon. I wish that the head didn’t shake so much, but that was down to my accuracy, which I suppose comes with practice. I also wish the movement was slower, but even with the blank keyframes to elongate it, it still turned out pretty fast, which shows how much time it actually takes to do a fbf animation.
The third one I did was yet another skill available to learn/use in the program. This one was new to me and whilst I had heard of it before, I hadn’t attempted it previously. It involved adding a mesh to an image or drawing and animating it by moving certain points each frame. I believe that one of the examples is a praying mantis with which you could animate the arms and legs with. We decided to start off with something simple: a caterpillar.

This was my first attempt and a lot of things went wrong. I didn’t like the way that I drew the caterpillar and I knew that I would find it hard to animate with all those bumps (it would most likely look stretched and natural). I also had a lot of trouble with the mesh at first because it kept disappearing in the next frame and I had to figure out how to make it appear again with my previous movements saved too. I was frustrated and wanted to start again, so I deleted the comp and began afresh. My new caterpillar was much simpler, and I figured out how to keep the mesh on the drawing, and how to reselect if it disappeared.

I used a reference video to try and replicate the caterpillar movements as accurately as possible. I still had trouble with this though, since the caterpillar didn’t scrunch up/bend in the way that I wanted and I couldn’t fix this without stretching it to a weird extent.

As before, I went back in at the end to add in keyframes and make changes, where I felt, was necessary. Onion skin really helped me here, and I knew that it was a vital part of the process. I also made sure to add a loop at the end and extend the blue bar at the top so that every frame was captured and a part of the loop. I wasn’t too happy with how this one came out so I didn’t change the background.

I think that my main problem is speed and I will push that down to time. It takes a while to make a little enough movements each time that the subject looks realistic but I also think I need to try out a different method. Pose to pose will allow me to choose how many seconds it takes from one movement to the next and it would then be a matter of filling in the in-between frames. I feel that this method would give me more control and I plan to watch a tutorial on how this can be done in Animate, as I don’t feel comfortable at the minute attempting it myself and potentially making wrong habits.
As a quick recap before I jumped onto the main animation was squash and stretch again, this time I decided to make it a little more interesting. Instead of doing a simple bouncing ball, I went for a square and added a face. I felt that this would accentuate the principle even more because you would be able to see the face really stretching out. I used the same method as last time and because of the simple movement, straight ahead was fine to use.

I was starting to get the hang of how the keyframes work in Animate and finished must faster, especially with the copy and paste option. I also tried playing around with adding easy ease to the animation although I went through quite a few settings and don’t remember exactly where I clicked in order to be able to edit the bezier curve. I will try to perfect this since it is one of the more basic things to add to an animation. I think that this one turned out much better than the first because of this and looks more fun and bouncy.

This is one of my favourite GIFS that I created and I would like to include this type of animation in future projects because I think that it’s super fun and easy to add anywhere!
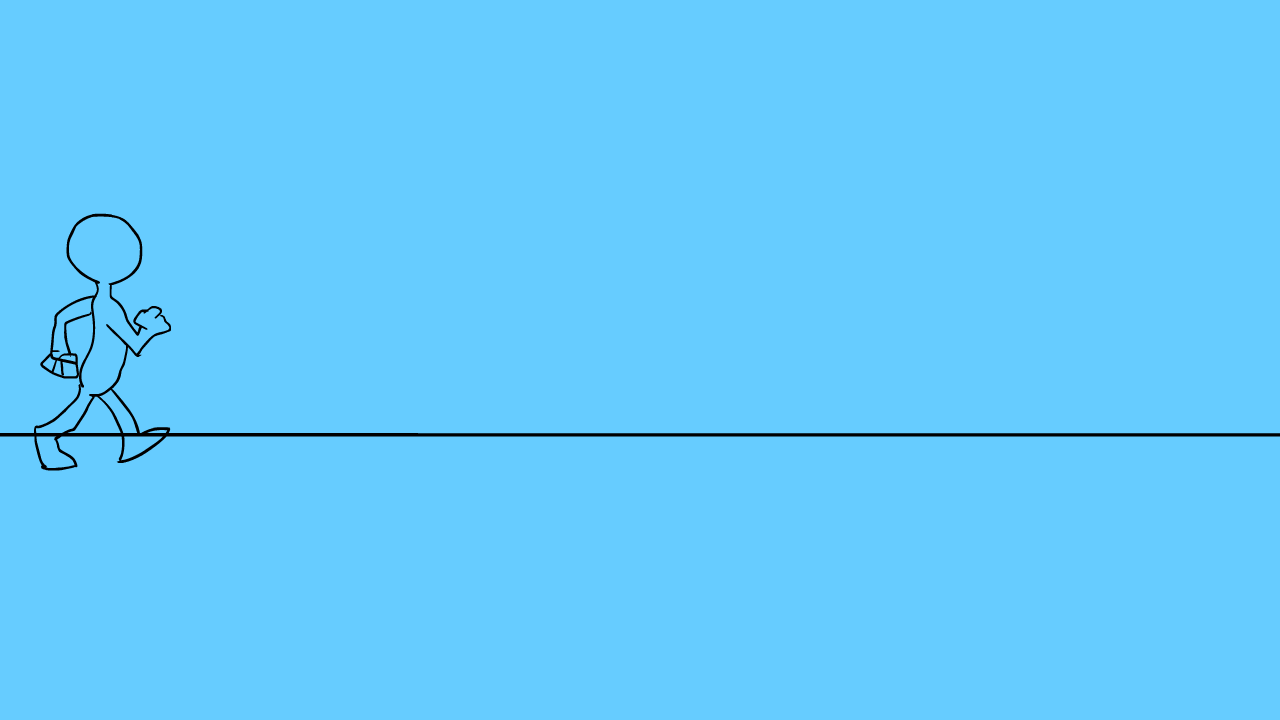
However, the most useful ones, in my opinion, are my walk cycle animations. We were asked to find a good quality image of a full character and animal walk cycle and trace over each frame in order to create the actual animation. There are loads of examples on the internet, but these are the two that I picked:


I imported the human walk cycle into Animate and added a new layer on top of the image. Then, with the paintbrush tool, I began tracing over the first position. I immediately noticed how hard it was to accurately trace the lines. I think that it was partly to do with the tablet and the fact that I was not used to using it (I have my own at home) but I also understand that it takes a while to create a good drawing, and it is why fbf animation usually involves a team. With my paintbrush and eraser presets, I went back and forth quite a lot, but ultimately, got through all of the positions at a steady pace. Each time I finished one and moved onto the next, I had to unlock the bottom layer and move the image to the left of the screen, careful to keep it level and make sure the feet and head were roughly in the same place if not a little above or below.

Because I had an image on the bottom layer this time, onion skin made it a bit confusing with all the lines, so for the most part, I had it turned off and trusted the example image for a good result. I actually really enjoyed the process despite the fact that it was tedious at some points. Personally, I like working hard and for long durations if it is coming up to a final result, like the final piece of a project, which is why fbf animation works well for me and is something I really like to do. When I had completed all of the positions, I played it back and saw that it was quite fast, which I expected. I added in blank frames in between each keyframe, repeating this process until I was satisfied with the speed, and then selected all of the frames, copied and pasted them next to the first group, and reversed them. Again, some tweaks were needed, so that the transition between the normal and reversed motions was as close to seamless as can be, but overall, I think that I did a good job.
I challenged myself further and made the character walk across the screen to see what kind of problems I would face then. I found that the image that I used was not made for this, and the character was clearly supposed to walk on the spot.

In order to make this seem more natural, I went in and copied and pasted a few of the frames next to each other, moving them slightly closer to the next position each time. This was different than simply adding blank keyframes, as instead of just slowing the animation down, it helped bulk it up and made it feel more full. Here are the animations:

I used the same method for the squirrel although it was a little more difficult since the image resolution was quite low and some of the details were too blurry to trace accurately. This taught me, however, that you don’t always have to be perfect when it comes to each drawing. Because it is an animation, and the human eye cannot focus on each little line because of the movement, you can afford to be quite loose and focus on how each frame looks overall rather than fussing with tiny little lines.

For this animation, I think that it goes a little too fast but even when adding blank keyframes, I couldn’t do much to change that. I like the part at the end especially, because of the tail movement but other than that, I don’t think that you get much of a chance to focus on the squirrel. Though, I am grateful that I completed it because it was useful practice and my first time animating an animal. As with all of them, I added a loop.

Final Consensus
Using Animate is quite different from After Effects because of the fbf aspect. Having to insert keyframes individually takes longer and for this reason, I’d say that to create motion graphics, After Effects is the better choice, as it is faster and would be more efficient in a project. Animate has a feature called onion skin, which lets you see previous and future frames if you’ve created and is extremely useful when you have to reference the previous position of the subject. In my opinion, animating characters and experimenting with different styles is quite hard in After Effects. In this program, you have more freedom thanks to the onion skin and can go down any route with only the imagination and possibly timeframe as your limit. I still have a lot to learn in Animate, but I think that for character animations, I would use it, and it is going to help me gain essential skills for the animation industry, and hopefully ones I can use in my culture brief idea.