
Welcome to Maya
To inaugurate us to the program Maya, we first had to go over some 3D basics, starting with an introduction to polygons, which are what allow us to build and model in a 3D environment.
The Polygon Theory
3D Models are created using three components: vertices (points in 3D space), edges (join 2 vertices together) and faces (a closed set of edges).

A polygon primitive is the most basic shape that you model with. In 3D, we tend to work with quads, not triangle polys because they are easier and allow for a cleaner model, whereas triangles tend to deform.


Polygons combine into one mesh that works as a surface of 3D objects. So, logically, high-poly models are made of many polygons while low-poly contain fewer of them. . Games use triangles, not polygons because most modern graphics hardware is built to accelerate the rendering of triangles. At one point, there was not enough processing power to have many polygons, meaning there was a lot less detail in characters and environments. Each game has a different polycount, but most contemporary games have to meet the standard that is recommended to stand a chance in the market – a human character can be around 15.000 and 25.000 triangles, only the body, naked. And it can go as high as 50.000-60.000 triangles if you include the character’s clothing, props, weapons, etc.


Starting in Maya
My first impression when I opened Maya was that it seemed very complicated. There appeared to be a ton of functions, a different timeline and a lot of modes/layouts (which made sense as it is a multi-purpose program). I reminded myself that every program I have come face to face with so far has started out in a similar manner and that once I got into the modeling mindset, I would get used to the format and use it with more ease and confidence. We began by identifying two of the most important tools, that everyone needs to understand in order to use Maya. These were the basic selection tool (the mouse essentially) and the Poly modelling shelf which contains all of the polygon primitives that are used to model.

We all grasped this in a few seconds, so we quickly moved on to placing one of the polys onto the grid. This was done by simply clicking on the icon wherein the program instantly places the polygon in the very centre of the grid. Of course, we went with a quad, since they are most frequently used. In order to see the cube from different angles, you hold the alt key and press the left mouse button and simply move the mouse around on the screen. This is called tumbling. If you just want to move further up/down/left/right without changing the angle, you hold alt again and press the middle mouse key and move the mouse. This is called panning. Now we could view the shape on screen from any point we want. Before remarking on the arrows or appearance of the cube itself, we talked about its position and how Maya plots it on the grid.


Using the Channel Box, which can be seen to the far right, Maya shows the precise location of the cube in the 3D space, using the Cartesian Coordinates. Since the cub exists, it is ‘1’ on the scale factor, and because it hasn’t been rotated, all of those axis display ‘0’. As for the ‘translate’ section, the world essentially means the position of the object and is referring to the translated coordinates of the position. The values are negative because if you move the shape towards the axis, it is a (+) and away from this results in a (-). As for how the cube can be moved and manipulated, we went straight to the toolbar on the left and explored the three most commonly used tools.

The shortcuts for each of the tools are actually next to each other on the keyboard, which makes perfect sense as you will have to switch from one to the next quite quickly and often. They allow the polygon to be moved in any direction, rotated and made bigger or smaller – essentially the basics of modelling. We got to play around with these to see how each one works and get used to changing from one to the next. Firstly, to ensure the cube is selected, we clicked on it and it highlighted green, and the channel box appeared as well. After that, by selecting any one of the tools, we could manipulate the cube, such as changing its position, which also changed the values in the channel box, similarly with rotation and scale. After selecting each tool, a different set of arrows/axis appeared on the cube, which meant that we could also change individual aspects of the cube too, such as elongating it but clicking and dragging the x-axis arrow with the scale tool selected, or rotating it in one direction by pressing on one of the lines in the sphere. If you want to scale up/down the whole cube, simply click and drag the tiny cube in the centre of the shape.

I quickly found myself using the shortcuts for the tools, instead of clicking their respective icons on the screen. It seemed to happen almost automatically, and it was a much more fluid motion that allowed me to work faster – it’s incredibly useful! Something else we touched upon is that the little icon in the bottom left of the screen always shows you which axis you are on so that if you leave the screen for a couple of minutes or get distracted, you don’t have to reselect everything and start again, but just glance down and see what action you were in the middle of doing. Also, another way to speed up the process is you know that you want the shape to be a particular way, you can simply go to the channel box, and input the degrees manually (e.g. 90°).
Next, we moved on to look at the Modeling Tool Kit and Attribute Editor, which as the name suggests, edits the shape and its attributes. It is located near the channel box but is the third tab down. We focused on the Modeling Tool Kit tab, which has options at the top once you enter. Clicking vertices or edges, or any component, allows you to manipulate that individual part of the shape, and essentially model! For example, I clicked vertices and selected one of them, and I could then edit that one vert. Shift selecting multiple allowed me to edit multiple, and it is the same for any compound.


A shortcut for this is to right-click on an object, making sure it is highlighted green and fully selected, holding the mouse key down and hovering over different components.
Now that we were a little more used to working with a primitive, we found that constantly changing the perspective was quite time-consuming, so of course, Maya had a built-in solution for this as well. On the left sidebar, underneath the basic tools, were layout options that the user can choose from. These are the ones that we used:

The layout with four viewports is most commonly used (and most useful in my opinion), so there is a shortcut to make it quick and easy to get to it. The space bar is what brings up 4 viewports and if you click on one of them, it will make the entire space only that one, making it easy to flick back forth between them.

But what about using other primitives? We deleted the previous object and created a sphere. As can be seen, the sphere has a lot more polygons than the cube because it has curved edges. I clicked the shape and pressed ctrl + d to duplicate it. Holding shift and tapping d makes multiple duplicates appear and soon we had a lot of objects in the scene, so a good way to see them all was through the outliner.

After everything that we had learned, we got to have a little fun and actually start modeling! Using three of the spheres already in the scene, I used the scale tool to change the sizes and the move tool to place them on top of each other, with a slight tilt so that the position looked more lively. Using different primitives, it was really simple to create a nose and arms as well, so I had built my very first model, a snowman.

Before I had a chance to refine it any further, however, we were already moving on to the next useful skill to know in Maya, which would make hard-surface modeling a lot easier and faster.
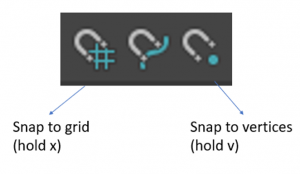
Similarly to the anchor point in After Effects, shapes in Maya have a pivot point, which defines the position around which the object rotates or is scaled from. By default, it is located at the centre of the object, but it can be moved. To do this, with the shape selected, press ‘d’ to enter edit pivot mode, which can be seen thanks to the pivot point changing. Next, hold ‘v’ down, hold the left mouse key and drag the pivot point to wherever you would like (it should automatically snap to the main positions). Press ‘d’ again to exit the mode.

The reason for doing this is to enable the object to snap to the grid or another object. Snapping ensures objects are right next to each other, without any gap, so that you don’t have to spend a long time attempting to stick them together. It’s an important tool for accuracy. To snap the shape to the gird, you hold ‘x’ down and move it towards the grid, where it should automatically place itself directly next to. To snap to another shape, hold ‘v’ and using one of the arrows, move the shape towards the other one, and they will snap together neatly. I could immediately see how useful this tool is and how it saves so much time, allowing for easier, cleaner modeling.

Using this technique, I started out with some basic snapping, by creating a plus symbol with five cubes. I noticed that duplicating the objects which already have the pivot point moved in place made the process simpler and faster, however, didn’t work when I moved to the other side of the plus. At that point, I realised that I had to move the pivot point to the other side of the cube, otherwise it would not snap to the object alongside that corresponding side. After grasping this, I moved on to building my name out of blocks.


This was so much fun to make! Despite all of the duplication, however, there were still times when I needed to move the pivot point to a different part of the cube, and the hardest part was not rushing; at that point, I had gotten used to the steps and wanted to speed through, but because there are quite a few, when I involuntarily sped through, I ended up making small mistakes, such as forgetting to exit edit pivot mode or mixing up which letter to hold down. I had to go back quite a few times, and slowly go through each step, to make sure everything was in order, and I could snap properly. After a couple more lessons on modelling, I am certain that this will become second nature, and I won’t be messing up, even if I go through the process at a faster pace.
After this, we were taught how to add colour, which I was really looking forward to since the grey gets a little boring! Select an object, or shift select multiple, hold down the right mouse key, scroll down and select ‘add new material’ in the panel of options. Another panel should then pop up, where you can choose which material to add. For our first time, we added ‘Phong E’ which had a slight reflective quality, evident thanks to the highlights. Once this is chosen, on the right, the editable options within Phong E appear and you can change various settings – which there was quite a lot of. We stuck to simply choosing a colour using the classic eyedropper technique. It was nice to do such a familiar action, and it worked right away!

The model looks so much better when it has some life brought into it through the colour. This is one of my favourite, if not my favourite technique we learned in Maya since it’s the fun part towards the end of creating something that you always look forward to. To me, a model is never fully complete without the colour added, no matter how complex it is, because it just seems to be missing that final element that heightens the realism.
Here are the models that I created using everything above:


When I first started creating the castle, I was putting together a basic structure with four outer walls, and two towers near the back. It didn’t look bad but I wanted to make something a little more complex and ensure that my castle wouldn’t look too basic or boring, so I found an image of a castle that I like the look of and used that as my reference. My aim wasn’t to make an exact replica, but rather take inspiration from the shapes of the buildings and their position in the castle. I moved a few things around but kept the basic courtyard the same. I didn’t use snapping very much, since I was scaling most of the buildings to the size that I wanted, or intercepting cubes into other cubes so that interesting ridges were created. Once again, I realised how much easier it is to use the shortcuts for the tools, and after a while, I automatically began to do it.

I also found that 2-view was very useful for this particular model. I didn’t feel that four different perspectives were necessary since I was moving the castle around a lot anyway as I added new primitives to it, but the second viewport of the front of the castle was great to glance at or watch when adding and aligning a new object. This method of having one main area to model in and one for accuracy and general aid really worked for me, but I am curious to try out working in the multiple view layout. I like that I didn’t make the castle perfectly symmetrical because very few castles in real life are, and my reference castle also wasn’t (I think they’re actually more beautiful because they are asymmetrical). My favourite part was probably adding the cylinders at the front because they made it more clear that it is the entrance of the castle, and the difference in size and shape added some variety to my model, making it nicer to look at.

Experimenting with the limits of the primitives was exciting; I wanted to create a triangle to put on the top of my entrance, similarly to the triangular building on the entrance of the castle in my reference, so I created a new cone and flattened it all the way using the scaling tool before then moving it in place. This was nice, but I wanted to try and create a more accurate version of the roofed tops of the buildings. So, as can be seen in the image above, I flattened and stretched out a cube, rotated it, and placed it on top of one of the flat buildings. After creating a duplicate, I rotated it in the opposite direction and moved it to align with the first one, creating a roof shape. This next part was hard, and I wish I had simply extruded, but I used the same principle as I did for the entrance, and flattened a cone into a triangle. I then placed it in between the two thin rectangles and scaled it as best as I could so that there were no gaps. This didn’t look perfect, but it got the job done.

Even though I wish that I had more time to work on it, and add more parts, I really love the way my castle turned out, and I had a lot of fun making it. I think that for the first 3D building I have ever modelled, it was a pretty good attempt, and I achieved my goal of making it visually interesting, with various heights and shapes. Looking at it now, I think of all the possibilities with the skills I already know, such as creating the gardens around the castle, adding colour and other finishing details such as flags. I hope that I have the time to attempt something like this in the future!

This was something I actually created before the castle when we were mainly working with spheres. We were shown how to create the basic body and face, and afterwards, add details if we wanted to, such as the scarf, which I used a doughnut primitive for, and it turned out more like part of the costume.

Adding the pink colours made my bear look a little like a mix of Whinnie the Pooh and Piglet, but I liked that outcome. There wasn’t really any difficulties when making this one – it was a smooth process, resulting in something cute and simple!

We also got to try out Arnold, Maya’s renderer. There was, once again, a lot of options to edit and change, and we mainly worked on stylising the lighting and colours. I opted for a purple background, with warm lighting coming from the right. Unfortunately, I don’t have sufficient notes on what exactly I did, but I do remember Arnold being a little difficult to work with, rendering slowly and never quite in full definition. That’s why there is a slightly fuzzy look to the final render, but it works in my favour thanks to the cute style, so I am not too annoyed.
Some Extra Tips and Tools that I Learned:
- To join two shapes, shift select both, go to mesh, hit combine.
- If the grid disappears, press F to bring it back to the centre.
- To zoom in on one particular object, select it and hit ‘F’.
- If the channel editor isn’t there, right-click and hold the shape and click ‘object mode’.
Final Opinion
On the whole, I really like working in 3D and Maya is a great program to start in, because of the basics, which are quite simple to grasp, and I feel that any beginner would be modeling in no time as I did. Despite all of the things that I have learned to do, my initial impression of it being a complicated program hasn’t changed too much because even within the skills we did learn, there were so many buttons, functions and sections that I didn’t understand or go into. It feels like with each new area of Maya I venture into, fifty new sub-sections open up, all of which also can be explored and adjusted, which is daunting. But I know that this is why Maya is so popular in the industry – once you get to know the program, there are virtually no limits as to what you could create. I am still set on mastering and working in 2D, but 3D has proven to be more riveting than I expected, and I look forward to learning more.